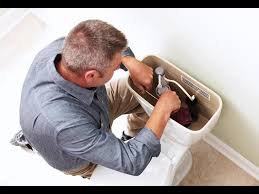
A running toilet takes 10 to 15 minutes and $5 to $15 in parts to fix if the flapper is the problem, or up to 30 minutes and about $10 if you need a new fill valve. Either repair is a beginner job that needs no more than a wrench and an evening. Before you buy anything, though, you need to know which of the two parts is actually failing, because replacing the wrong one wastes money and doesn’t stop the hissing, phantom-flushing sound that’s driving up your water bill. This guide walks through a two-minute diagnostic test, then the exact steps for swapping either part using real, currently stocked hardware.
Time, Cost, and Difficulty
Flapper replacement: 10-15 minutes, $5-17 in parts, beginner difficulty. Fill valve replacement: 20-30 minutes, $9-16 in parts, beginner difficulty. No plumber, no special tools beyond what’s already in a kitchen drawer.
What You’ll Need
- A Fluidmaster universal adjustable flapper, about $16.89 at Home Depot, or a Korky universal flapper, about $11.98
- A Fluidmaster 400A universal fill valve, about $9.98, only if the diagnostic points to the fill valve
- Food coloring or a dye tablet (a few drops from a kitchen bottle work fine)
- An adjustable wrench or channel-lock pliers
- A small bucket or towel for the water you’ll spill
- Scissors, if your new flapper’s chain needs trimming
Step 1: Diagnose the Real Problem First
Lift the tank lid and flush once, then let the tank refill completely and sit undisturbed for a few minutes. Add four or five drops of food coloring to the tank water, close the lid, and wait. According to a municipal dye-test guide, if colored water shows up in the bowl within 15 minutes without a flush, the flapper isn’t sealing and is letting tank water leak past it into the bowl. Ogden City’s water utility recommends this exact window as the threshold for a confirmed flapper leak, and Lowe’s testing guide gives a similar 25-minute cutoff.
While you’re in there, check the water level against the overflow tube, the open vertical tube in the center of the tank. If the water sits right at or above the rim of that tube, or if you can hear water trickling into it continuously, the fill valve is overfilling the tank and the excess is draining down the overflow into the bowl. That’s a fill valve problem, not a flapper problem, even if the dye test also shows some color coming through. Fix the fill valve first in that case, since a valve that won’t shut off will keep the flapper under constant strain regardless of which part looks worn.
Step 2: Replace a Worn Flapper
- Shut off the water supply. Turn the oval valve behind the toilet clockwise until it stops.
- Flush and hold the handle down to drain most of the water out of the tank, then sponge out what’s left so you’re not working in standing water.
- Unhook the old flapper from the two pegs or the collar at the base of the overflow tube, and disconnect the chain from the flush lever.
- Attach the new universal flapper to the same mounting points, feeding the ears over the pegs or seating the collar over the overflow tube per the packaging.
- Connect the chain to the flush lever, leaving about a half-inch of slack. Too much slack lets the flapper reseat before a full flush; too little holds it open and causes a running toilet all over again.
- Turn the water back on, let the tank fill, flush once, and rerun the dye test to confirm the seal holds.
Step 3: Replace the Fill Valve
- Shut off the supply valve and flush to empty the tank, then disconnect the supply line from underneath the tank with an adjustable wrench.
- Remove the locknut holding the old fill valve to the tank floor and lift the valve straight out.
- Set the new valve’s height by twisting the shank so the critical-level mark sits at least an inch above the overflow tube, a spec confirmed in Fluidmaster’s own 400A installation instructions.
- Seat the valve and hand-tighten the locknut underneath the tank. Fluidmaster’s guide specifically warns against over-tightening with a wrench, since it can crack the tank.
- Reconnect the supply line hand-tight, then turn the water back on.
- Adjust the float clip up or down until the water level sits about an inch below the top of the overflow tube, then flush a few times to check that it shuts off cleanly.
When to Call a Plumber
If the toilet still runs after you’ve replaced both the flapper and the fill valve, the problem is likely a corroded flush valve seat or a cracked overflow tube inside the tank, which calls for a professional inspection rather than another parts swap. The same goes for any hairline crack you spot in the tank itself while you’re working. And if the supply valve behind the toilet is seized, or won’t turn fully closed, replace that call with one to a plumber, since a stuck shutoff valve usually means the whole assembly is old enough to fail without warning.
Leave a Reply